The Tongariro Alpine Crossing is said to be the best day hike in New Zealand. Although the weather is tricky, the terrain hard, and the slopes steep, the hike is becoming increasingly popular. It’s definitely worth the effort, but you do need some luck when it comes to the weather. Go prepared and read up on the track beforehand. It’s not for fun they changed the name of the track from Tongariro Crossing to Tongariro Alpine Crossing recently, but to warn people of the terrain they’re about to head into.
Here’s everything you need to know before hiking the Tongariro Alpine Crossing in New Zealand.
Tongariro National Park
Tongariro National Park is New Zealand’s oldest national park and the first to be gifted by a country’s indigenous people. It has a dual World Heritage status, in recognition of its natural and cultural significance. Tongariro National Park is situated in the centre of New Zealand’s North Island, accessible from both Wellington in the south and Auckland in the north. It encompasses 3 active volcanoes (Mount Tongariro, Ngauruhoe, and Ruapehu), and is popular with both skiers and hikers.
Did you know Tongariro National Park was the set for filming Frodo and Sam’s journey into Mordor? You have seen Lord of the Rings, right? Well, the volcanic terrain of Tongariro National Park was perfectly suited to be the wasteland surrounding the strong hold of the dark Lord Sauron. Some digital alterations here and there and voila: Mount Ngauruhoe becomes Mount Doom.

The Tongariro National Park Visitor Centre is located in Whakapapa. This tiny alpine village at the base of Mount Ruapehu is the main entrance into the National Park. Most people spend the night here when visiting Tongariro National Park. We did too, sleeping in our campervan in Whakapapa Holiday Park. Do note it’s small and pretty remote, so best bring food with you, as it’ll be quite expensive here. The visitor centre, full of interesting information on Tongariro National Park, is definitely worth a visit, even if it’s just to see the 3D model of the national park. They (obviously) have up-to-date and accurate information on the hiking tracks and weather conditions as well.
The most popular activity in Tongariro National Park is without a doubt the Tongariro Alpine Crossing. We’ll elaborate on that in the remainder of this post. We also visited the nearby Tawhai Falls. We parked our campervan at the car park along Bruce Road, the main road leading into Whakapapa. From there it’s about a 10-15 minute return walk, taking you along 2 lookouts over the Tawhai Falls. Definitely worth a short stop if you have the time.

Tongariro Alpine Crossing – Getting there
The trailhead of the Tongariro Alpine Crossing is a 20 minute drive from Whakapapa, and it’s a one way hike. Even if you have your own vehicle, it’s better to book return transport with one of the several transport organisations. You can book one of the shuttles at the Tongariro National Park Visitor Centre, but some accommodations offer that service as well. We arrived in Whakapapa after closing time of the visitor centre, so had no choice but to book our return transport to the Tongariro Alpine Crossing through Whakapapa Holiday Park.
The Whakapapa Holiday Park works together with Roam, so that’s the organisation that shuttled us to and from the Tongariro Alpine Crossing. It cost us NZ$35 per person, including return transport, an information folder about the Tongariro Alpine Crossing, and some friendly advice. They depart daily from Whakapapa at 7:00 or 8:00 in the morning, to pick you back up at the Ketetahi car park after the hike at 15:00 or 16:30. They promise to leave no one behind (hope so!), so just notify the driver when you aren’t going to make it. They’ll come back for you. Unless you miss the last bus because you did a detour, then you’ll have to pay extra for them to come get you.
You can find some more information about the services Roam offers on their website.

Tongariro Alpine Crossing – Practical info
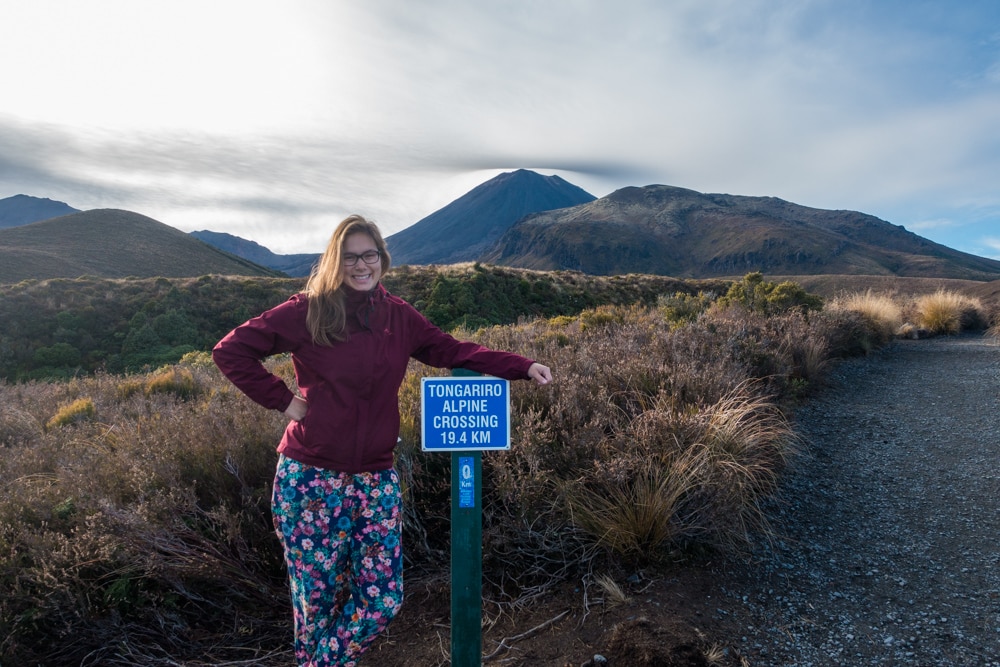
The Tongariro Alpine Crossing is a difficult 6 to 8 hour, 19.4 km one way hike. Hiking time depends on your pace, the weather conditions, and how often you stop to rest and take in the view. (We did it in 6 hours, and will discuss the conditions we hiked in further in the “our experience” part of this post.) The track is well marked and you can hike it in either direction, but it’s recommended to start at the Mangatepopo car park and cross over to the Ketetahi car park. There’s less (but more than enough) climbing involved when going that way.
When hiking the Tongariro Alpine Crossing, you’re traversing volcanic terrain. You’ll pass craters, see emerald lakes, and marvel at gorgeous views. If you’d like to know more about the unique landscape you’re crossing, you can download the Tongariro Alpine Crossing app for free. It’s called Pocket Ranger and is developed by DOC and Project Tongariro. You can use it as a research tool when preparing for the Tongariro Alpine Crossing, and as your “pocket ranger” while actually hiking it. No need for a guide, the app will tell you everything you want to know about what you see. Wish we’d known about this app at the time!


If there’s one thing you should know before hiking the Tongariro Alpine Crossing, it’s that the weather up there is pretty unpredictable. To be safe, you better factor in a couple of days in Whakapapa in case you have to wait for acceptable weather conditions. Even then, the weather can change quickly, so a good forecast is no guarantee of a great hiking experience. Be prepared for those weather changes and wear/bring weatherproof clothes!
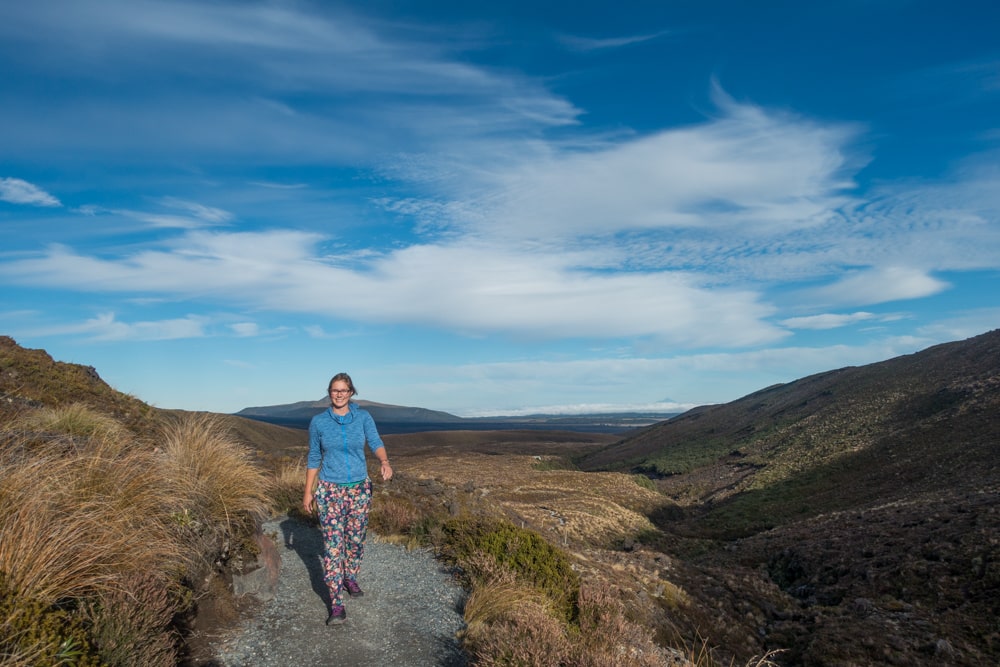
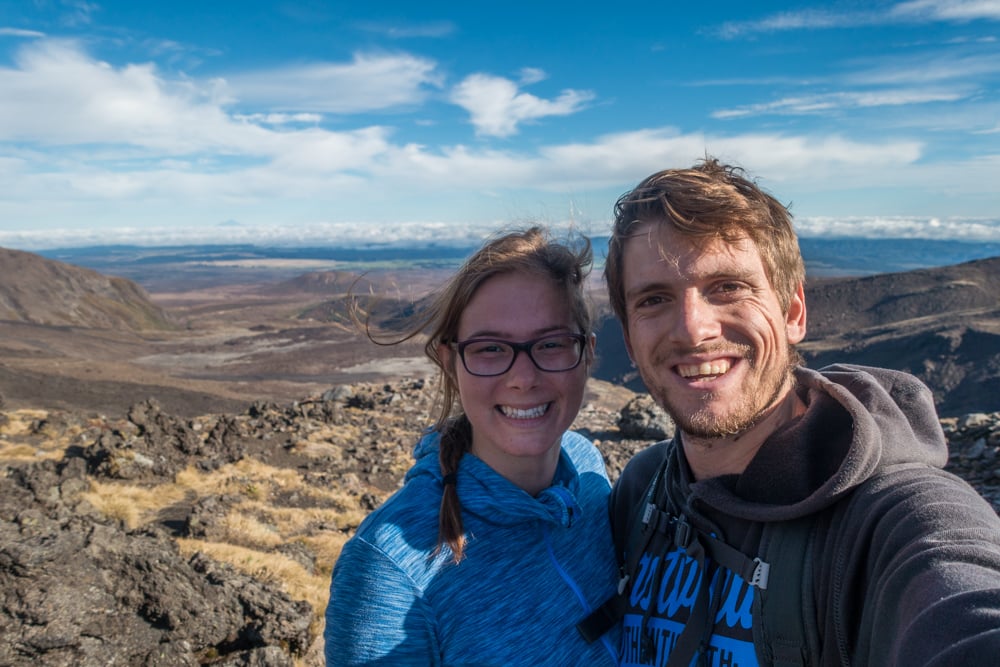
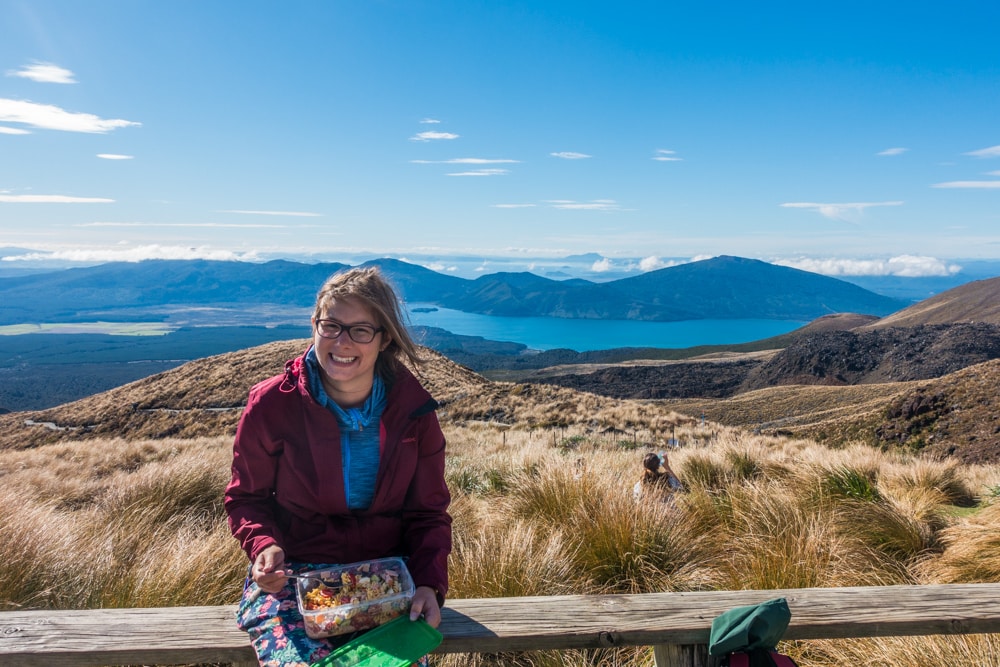
You can see the clothes in which we did the Tongariro Alpine Crossing on the photos: nothing special. We wore running shoes and a water- and windproof jacket. Our outfit was sufficient, but some gloves and a hat or something to cover our ears would have been nice at times. Do note we were very lucky with the weather. If it had rained, it would have been hell, as our shoes weren’t waterproof. Other things you need to bring are lunch, at least 2 litres of water per person, a cellphone, and a map. When it’s sunny, bring sunglasses and sunscreen too. Remember, the Tongariro Alpine Crossing is a demanding day hike. Challenge yourself within your physical limits and experience. We don’t consider ourselves experienced hikers, but you do need reasonable fitness.
Tongariro Alpine Crossing – The track
You can read all about the different sections of the Tongariro Alpine Crossing on the DOC website or the Tongariro Crossing website, but we’ll discuss them here briefly as well.
The main track
The first part, from the Mangatepopo car park to Soda Springs is fairly flat and takes about 1 to 1.5 hours. The path follows the Mangatepopo Stream, with a boardwalk here and there. Don’t forget to make a pit stop at Soda Springs, as those are the last toilet facilities for another 8.6 km or 4 hours.


The second part, from Soda Springs to South Crater, is known as the Devil’s Staircase, a well chosen name. Allow 1 hour for this seemingly endless series of steps, your calves will need a break. Pray for a clear day, or you’ll miss out on the views that make this steep climb worth the sweat.
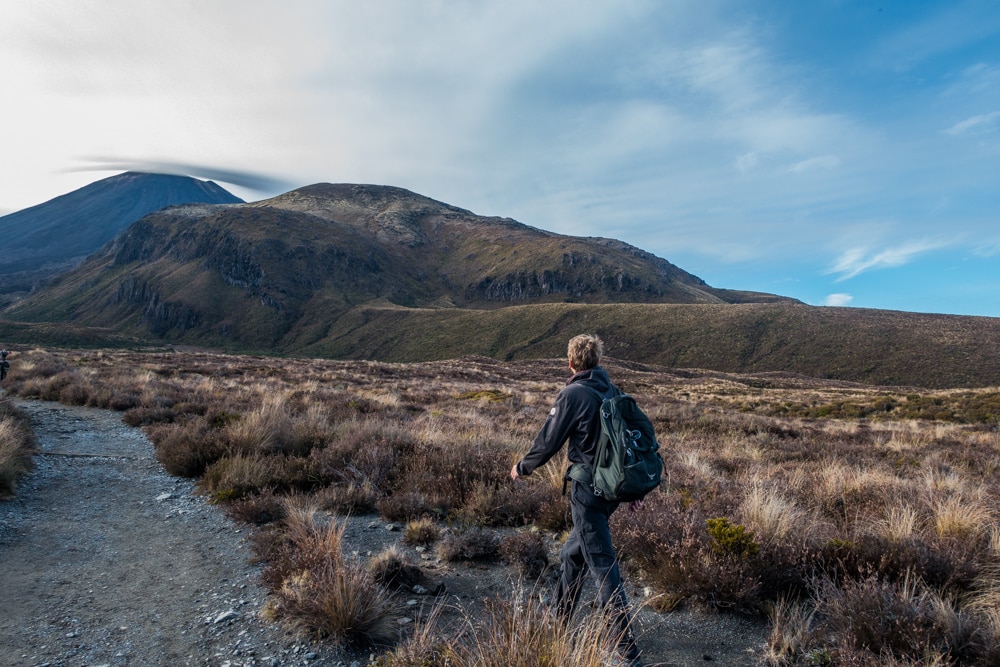
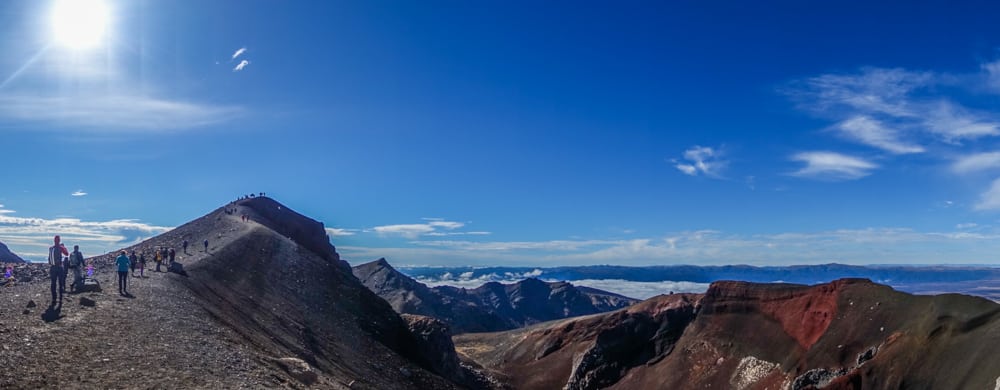
We’re not entirely sure which one is the hardest part, the Devil’s Staircase or the third part, from South Crater to Red Crater. Don’t be fooled by the flat part, a steep climb up the ridge to Red Crater is waiting. While trying to keep your balance and ascending in the loose dirt, strong winds will try and blow you off your feet. When reaching the signpost, you’re not at the top yet, but the last part is quite easy compared to what you just did. Allow 1 hour for this crossing from crater to crater.
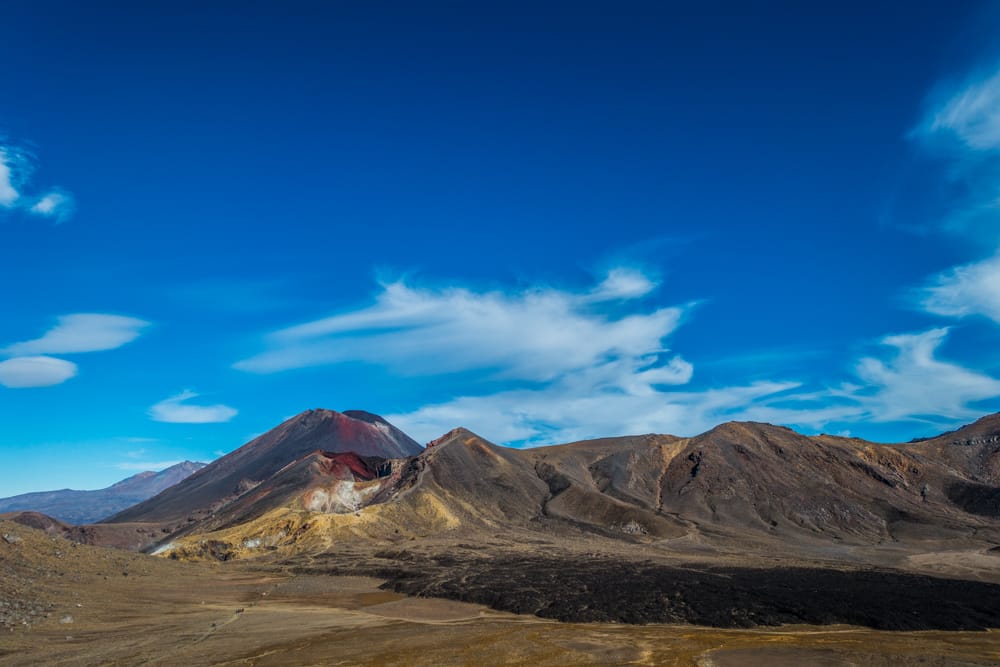
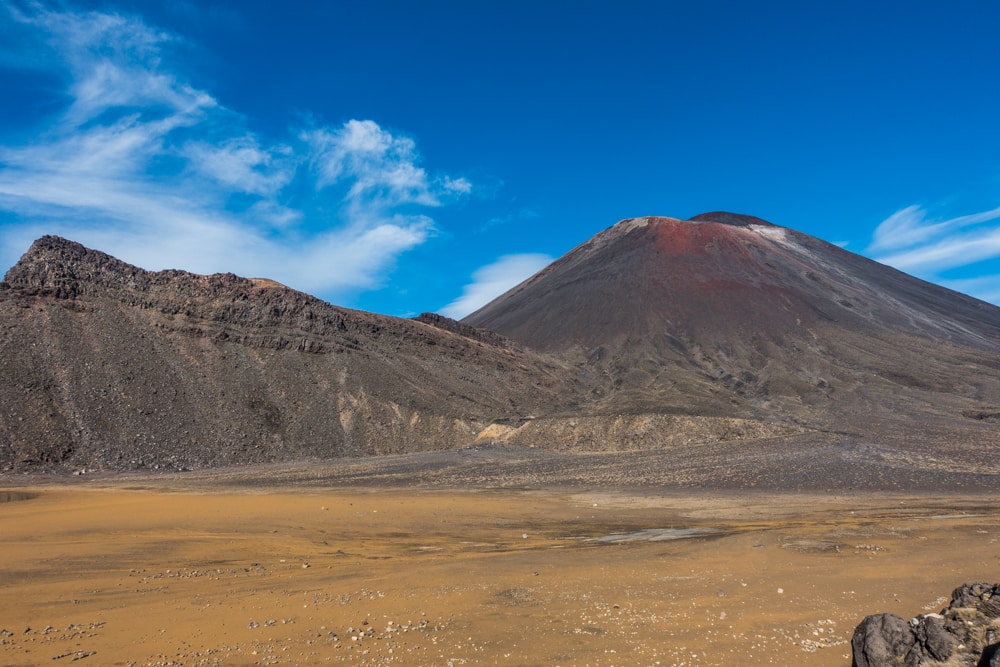
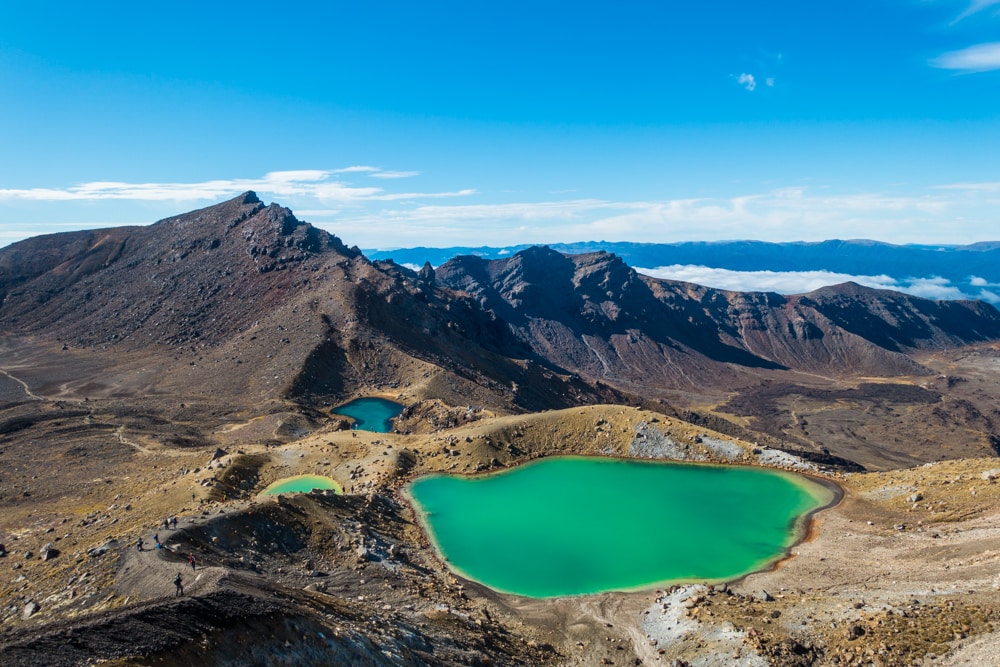
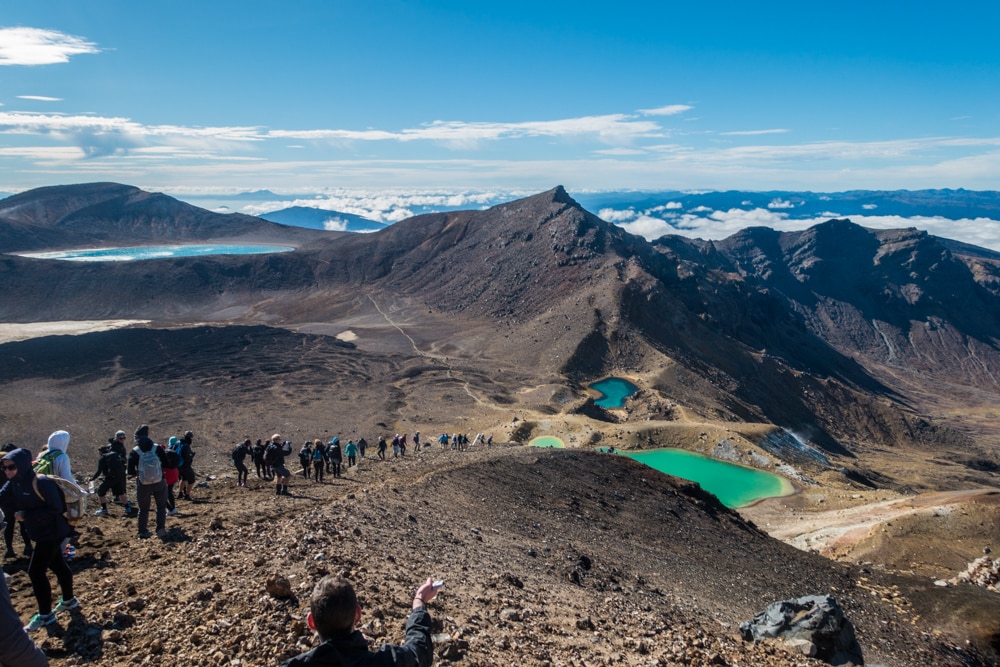
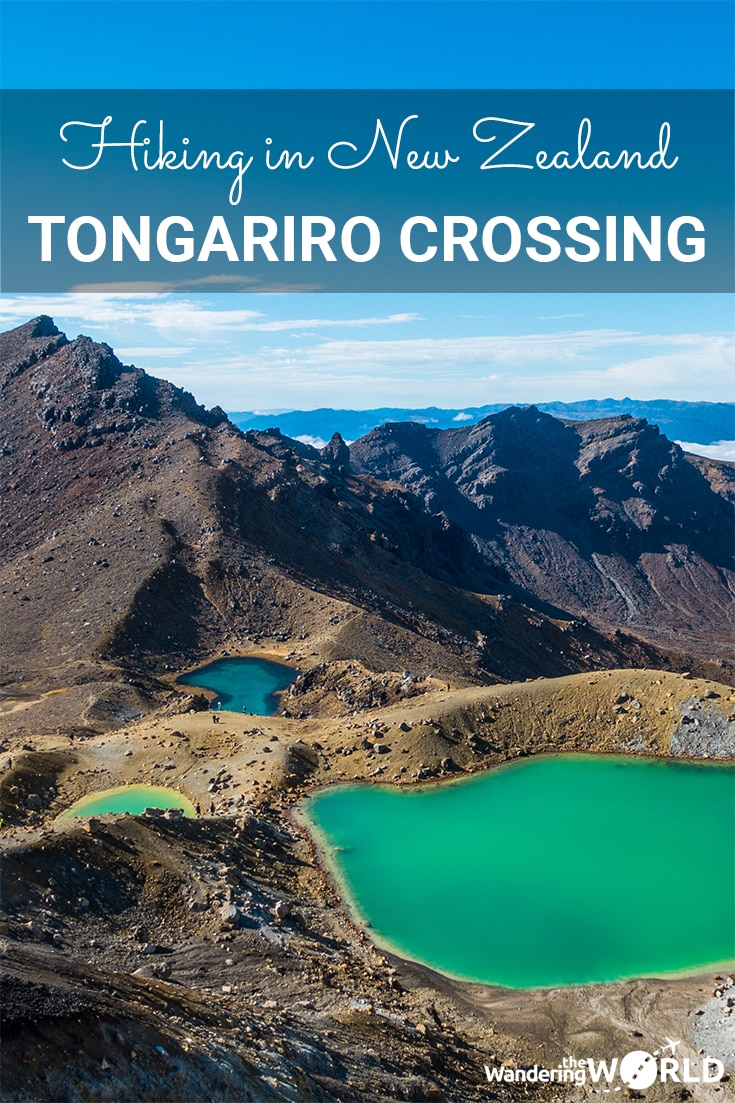
When you reached the top you can see the Red Crater and the Emerald Lakes below. From here on out you’ll be mostly descending. The first descent is a short, but difficult one towards the Emerald Lakes. The loose dark sand on the steep slope makes it slippery and chances are you’ll land on your butt at least once.

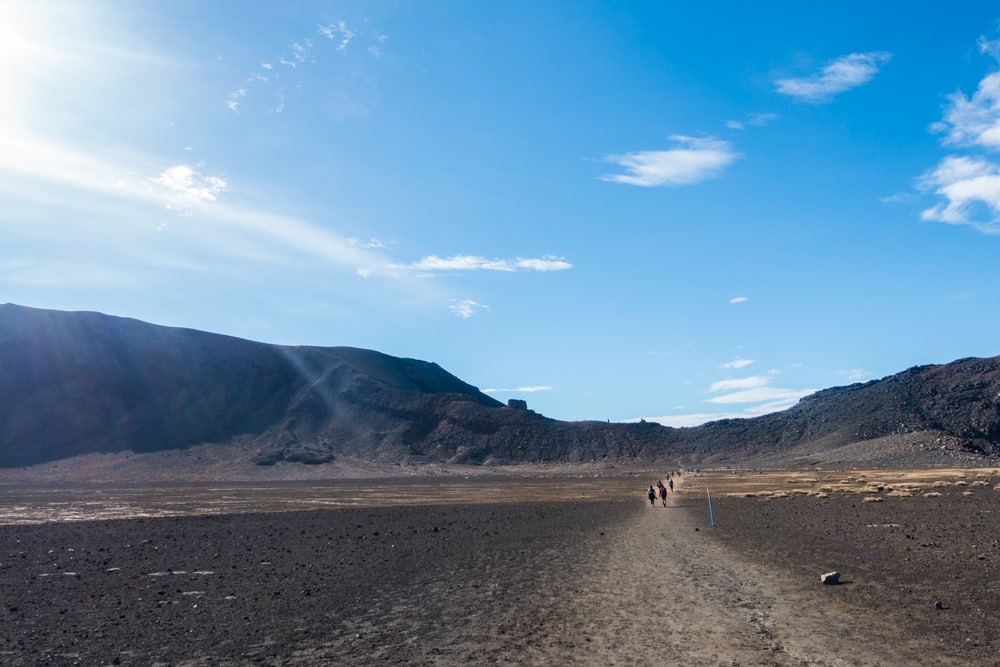
The next two sections of the Tongariro Alpine Crossing go through the active volcanic zone. Observe the warning signs and don’t hang around for too long.
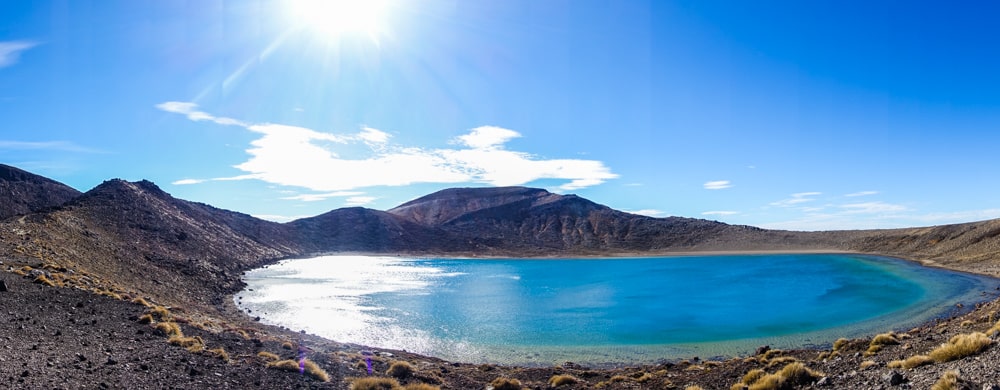
The next stop is the Ketetahi Hut, were there are toilet facilities once more, hallelujah! Before you’ll be able to empty your bladder and eat lunch, you’ll be passing the sacred Blue Lake (no swimming nor eating or drinking there). On a clear day you may even see Lake Taupo. Here the volcanic wasteland has made room for green lands and blue lakes again. Allow 1.5 to 2.5 hours to get from Red Crater via Emerald Lakes and Blue Lake to Ketetahi Hut.
After lunch you’ll start the last leg of the Tongariro Alpine Crossing, from Ketetahi Hut to Ketetahi car park. As if the downwards switchbacks towards the Ketetahi Hut weren’t hard enough on your knees, the steep descent keeps coming when leaving the hut behind. It involves a lot of steps, and not only down to our surprise. When reaching the tree line, you’ve reached the end of the Active Volcanic Hazard Zone as well. You can’t kick your shoes off just yet though, there’s still a trail through the forest between you and the end of the crossing.

The sidetracks
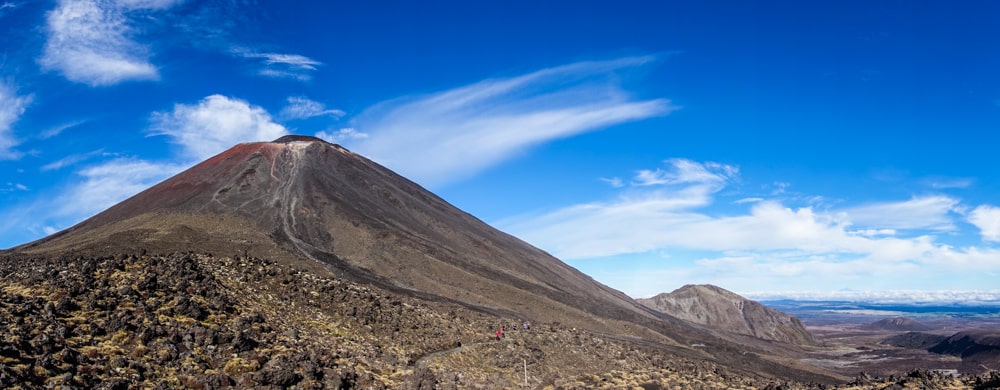
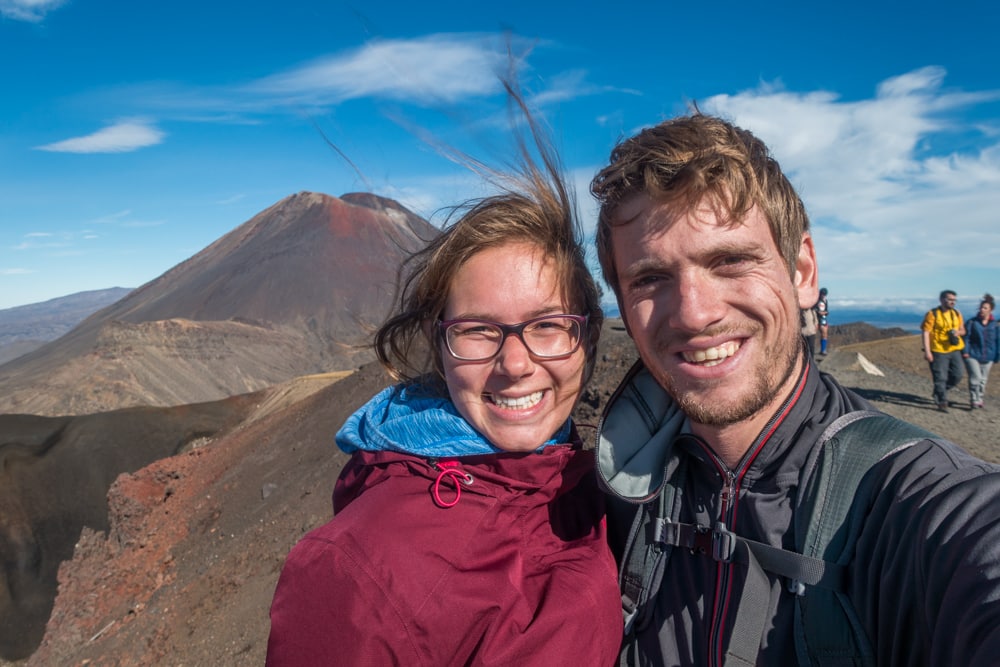
For the experienced hikers among us, there are a bunch of sidetracks to the Tongariro Alpine Crossing as well. One of them is a 3 hour return hike (on top of the 6 hour crossing) to the Mount Ngauruhoe (aka Mount Doom) summit. It’s highly discouraged to do this detour though, because of the loose rocky underground. Falling rocks can reach dangerous speeds, you don’t want to be hit by one of those. Only 2 weeks earlier someone broke both his legs like that and had to be picked up by a helicopter. Apparently this is the only walk in New Zealand for which you can’t get a guide. It’s that dangerous. Nevertheless, we saw quite some people risking the climb anyway.
Another one is a 1.5 hour return hike (on top of the 6 hour crossing) to the Mount Tongariro summit. This one is supposed to be worth the extra miles, but believe me when I say you’ll be glad to have made it through the 19.4 km of the Tongariro Alpine Crossing itself.
Tongariro Alpine Crossing – Our experience
On the morning of the big day (we were about to hike the famous Tongariro Alpine Crossing for God’s sake!) the minibus from Roam picked us up around 8:00 at Whakapapa Holiday Park. We received an interesting folder with walking times, some information on what to bring (too late though, we were already on our way), and a map. We had to write our names down, so our driver could fulfill the promise of Roam to leave no one behind.


About 20 minutes and a partly unsealed road later, we arrived at the Mangatepopo car park, the start of the Tongariro Alpine Crossing. Before letting us out of the minibus, the driver gave some tips (stock up on toilet paper at this car park) and warnings (don’t climb Mount Doom) concerning the crossing. There were 10 of us with Roam, and several other busses and vans crowding the car park, spewing hikers. And this was low season.
The first part of the Tongariro Alpine Crossing is pretty flat, and we reached Soda Springs without much difficulty. Time for a quick visit to the toilet, because after this we would have to wait another 4 hours before we would reach the next toilet facilities. From here the hard part started: the Devil’s Staircase seemed to last forever, and we had a hard time keeping our balance in the strong winds up the ridge to Red Crater. Do bring something to cover your ears, because the wind can be cold.


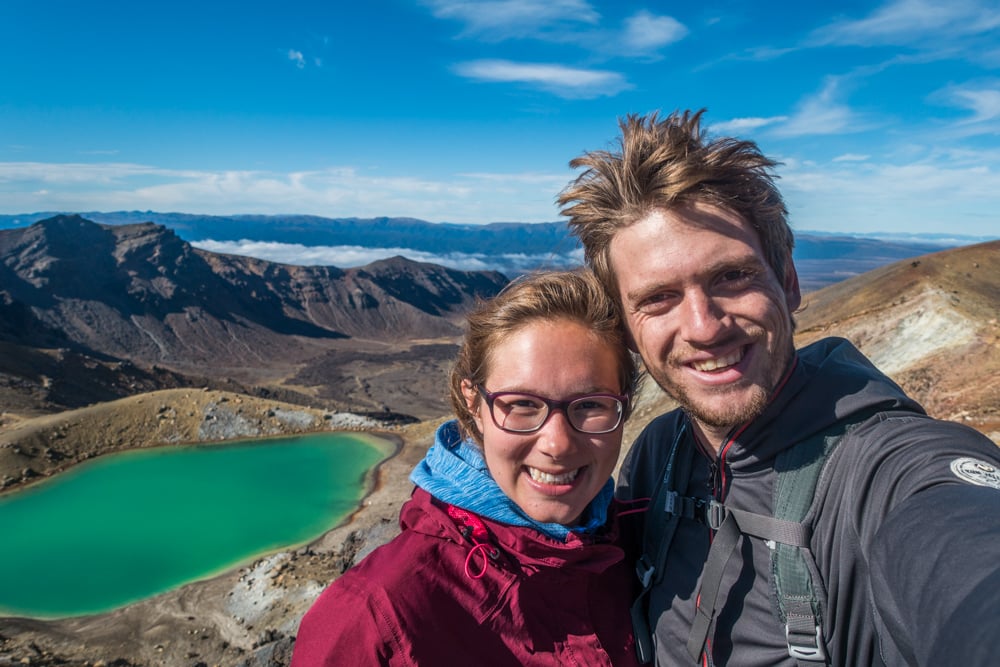
At 11:12, over 2.5 hours after leaving the car park, we finally reached the highest point of the Tongariro Alpine Crossing. The views are awesome! It was a clear day, so we could see the Red Crater, the Emerald Lakes and way beyond. They Emerald Lakes are gorgeous, especially the one with purple on the side!
The hike continues down to the Emerald Lakes. The sloop is steep and made up of loose dark sand. The trick to not end on your butt is probably to not go too slow, but still keep your speed under control. It’s a bit like ice skating, the way you’re sliding down, foot by foot. If you do end up on your butt: you won’t be the only one! I “sat down to take a break” too.


From here on out the track will be mostly descending. We passed Blue Lake and we were lucky to see Lake Taupo. You can see really far on a clear day! It was nice to see green mountains once more, and a relief we weren’t stuck in Lord Sauron’s strong hold. After zigzagging our way down to the Ketetahi Hut, we were surprised to find toilet paper in the toilet facilities. No end to our luck that day.
After some more steep descending (we nearly destroyed our knees) through golden tussock land and green forest, we finally reached the car park. We had made it to the other side of the Tongariro Crossing in just over 6 hours! Nope, we didn’t do any of the sidetracks, but we did do some geocaching on the way. Make sure to save the coordinates beforehand, as there’s no cell reception at certain parts. A lot more than expected there was cell reception and even 4G though.


The Tongariro Alpine Crossing is our favourite hike in all of New Zealand. Granted, this 6 hour hike is very popular, but it takes you over volcanic terrain, along awesome views. Prepare for steep climbs, strong winds and lots of hikers, but don’t miss out!
Tongariro Alpine Crossing in short
What? a difficult 6 to 8 hour, 19.4 km one way hike
Where? Tongariro National Park, 20 minute drive from Whakapapa
Bring? weatherproof clothes (rain and wind), lunch, lots of water, camera, a little luck
Know? book transportation, it’s a one way hike
Highlights? Mount Doom, Emerald Lakes, the view over Lake Taupo and beyond
Go prepared, stay on the track, and check out the DOC Know before you go page.

Liked this post?
We hope you enjoyed our post about hiking the Tongariro Alpine Crossing. Did we miss anything? Let us know in the comments. Did you find it helpful? Help us spread the word by sharing this post or pinning the following image.

We are going to NZ in three weeks and can’t wait to see Tonagario 🙂 Nice pics!
Awesome, Magda! It’ll be an amazing trip! How long are you going for? You can find a ton of information on things to do in New Zealand on our blog, feel free to browse through our posts. 😉 Enjoy your trip!
What an amazing experience – the colour of those volcanic lakes!! I’m a Kiwi myself but have never actually done the trek. Definitely something we’ll do upon our return home though 😀
Wow, I’m a little jealous you’re actually a kiwi, Sarah! Gorgeous nature you guys have there, we loved every second of our 4 week NZ road trip! I would love to read about your experience if you’ve hiked the crossing. 🙂
Oh wow, this looks so beautiful! I’m gonna have to make a return trip to NZ for something like this – so much to see in that amazing country!
Right, Jeannie?! I know! We absolutely loved New Zealand and its beautiful nature! We’ll probably head back there someday too. 😉